Launching your first cloud server can feel complex—but with Amazon Web Services (AWS), it’s surprisingly straightforward once you understand the workflow. In this guide, you’ll learn exactly how to create, configure, and access your first virtual server using Amazon EC2—AWS’s core compute service.
🚀 What You’ll Learn
- What a cloud server is
- How to launch your first AWS EC2 instance
- How to securely connect to your server
- Basic configuration and best practices
🧠 What Is a Server on AWS?
A server on AWS is a virtual machine (VM) running in the cloud. AWS calls these instances. With Amazon EC2, you can launch servers in minutes without buying physical hardware.
📋 Prerequisites
Before starting, make sure you have:
- An AWS account (sign up on Amazon Web Services)
- A valid payment method (Free Tier available)
- Basic understanding of terminal/command line (optional but helpful)
🛠️ Step-by-Step Guide to Launch Your First AWS Server
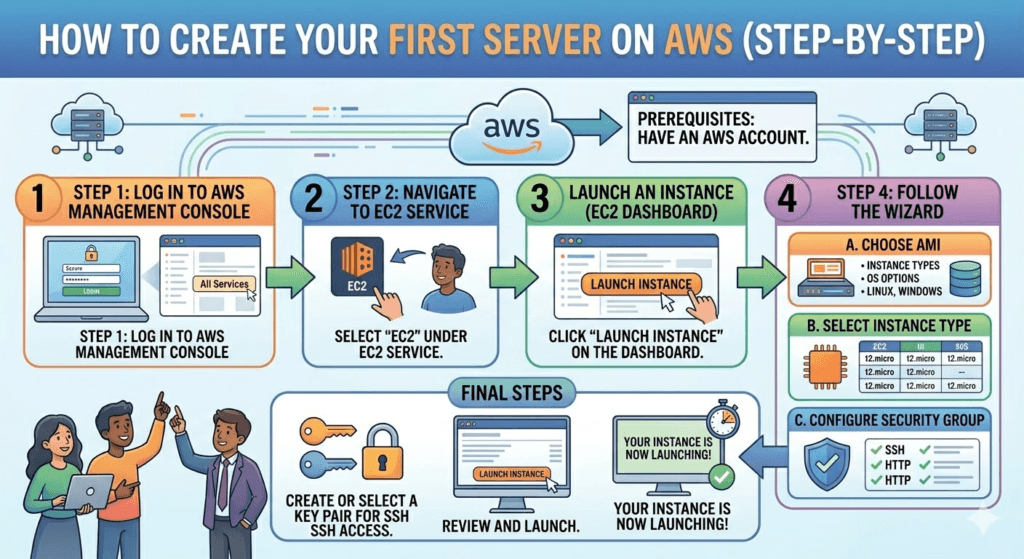
✅ Step 1: Log in to AWS Console
- Go to AWS Management Console
- Search for EC2 in the services search bar
- Click on EC2 Dashboard
✅ Step 2: Launch a New Instance
- Click “Launch Instance”
- Give your instance a name (e.g., MyFirstServer)
✅ Step 3: Choose an Amazon Machine Image (AMI)
An AMI is your server’s operating system.
Popular choices:
- Amazon Linux (recommended for beginners)
- Ubuntu
- Windows Server
👉 Tip: Choose Amazon Linux if you’re new—it’s lightweight and optimized for AWS.
✅ Step 4: Select Instance Type
Instance type defines CPU, RAM, and performance.
- Choose t2.micro (Free Tier eligible)
- Suitable for beginners and small workloads
✅ Step 5: Create a Key Pair (IMPORTANT 🔐)
- Click “Create new key pair”
- Choose:
- Name: my-key
- Type: RSA
- Format:
.pem
👉 Download and store it safely — you’ll need this to access your server.
✅ Step 6: Configure Network Settings
- Allow:
- SSH (port 22) → for Linux access
- HTTP (port 80) → for web server
- HTTPS (port 443) → secure web traffic
👉 For learning, you can allow traffic from anywhere (0.0.0.0/0), but restrict this in production.
✅ Step 7: Configure Storage
- Default: 8 GB (Free Tier eligible)
- Increase if needed depending on your project
✅ Step 8: Review and Launch
- Click “Launch Instance”
- AWS will provision your server in seconds
🎉 Congratulations! Your server is now running.
🔗 Step 9: Connect to Your Server
For Linux/Mac (Terminal):
chmod 400 my-key.pem
ssh -i "my-key.pem" ec2-user@your-public-ip
For Windows:
- Use PuTTY or Windows Terminal
👉 Get your Public IP from EC2 dashboard.
⚙️ Step 10: Basic Server Setup (Optional but Recommended)
Once connected:
Update packages:
sudo yum update -y
Install Apache (Web Server):
sudo yum install httpd -y
sudo systemctl start httpd
sudo systemctl enable httpd
Now visit your public IP in a browser—you should see a web page 🎉
🔒 Security Best Practices
- Never share your
.pemkey - Use security groups to restrict access
- Disable root login
- Regularly update your server
💡 Pro Tips for Beginners
- Use AWS Free Tier to avoid charges
- Stop instances when not in use
- Monitor usage via AWS Billing Dashboard
- Learn about:
- IAM (Identity Access Management)
- Elastic IPs
- Auto Scaling
📊 Common Use Cases
Your AWS server can be used for:
- Hosting websites
- Running applications
- Learning DevOps
- Testing environments
❌ Common Mistakes to Avoid
- Leaving ports open to the public
- Forgetting to stop instances (leads to charges)
- Losing your key pair (you’ll lose access)
- Choosing the wrong region
🏁 Final Thoughts
Launching your first server on Amazon Web Services using Amazon EC2 is a foundational skill in cloud computing. Once you’re comfortable with this process, you can scale up to deploying full applications, databases, and distributed systems.